Safety Checks
Introduction to Safety Check
In critical situations, every second counts. Security teams must quickly identify who is safe and who may be at risk, so assistance can be directed where needed. Safety Check makes this possible by combining rapid outreach to affected users with a simple case management interface—all in a single tool that gives teams the clarity and control they need when it matters most.
The Safety Check feature allows you to:
Reach affected users instantly through multiple communication channels
Get a clear picture of everyone’s status as responses come in
Update user statuses as support actions progress
Document activity at both individual and entire Safety Check levels
Keep a complete event log with notes and connected chats for full transparency
Act on the go with full mobile and responsive support for admins
How it works
Safety Check, available in both Basic and Premium tiers, pinpoints people in the affected area and begins outreach—manually in Basic, automatically in Premium.
The Safety Check begins by sending a single round of email, SMS, and push notifications simultaneously, prompting the person to confirm their status. No additional reminders are sent through these channels — the system then simply waits for a response.
With Premium, an automated voice call is triggered if no response is received. Phone calls are fully customizable: you can set a delay before the first call is placed, define how many call attempts should be made, and configure the delay between each attempt.
User responses are then recorded in the Safeture Web Portal, enabling administrators and security teams to take appropriate action. As support moves forward, administrators can assign statuses to indicate that a person has been handled, and add notes at both the individual and Safety Check level.
Explore Safety Check in the web portal through this video and learn how its features can help you:
https://vimeo.com/1122813094/7b8ae67cf9?share=copy
Features and Functionality
Initiating a Safety Check
You can manually initiate a Safety Check in three ways: from the Security Overview, from a Facility, or in response to an alert. For a step-by-step guide on how to manually initiate a Safety Check, see: How to manually start a Safety Check.
Automatically Initiated Safety Checks
Accounts with the Premium tier can also choose to have Safety Checks automatically initiated. When enabled, a new Safety Check will automatically be created and activated whenever a new high risk alert is published in the platform. Automatic Safety Checks can also be customised to activate only for selected alert categories. This is configured by the Client Development team.
Managing an Ongoing Safety Check
Once initiated, you can monitor the outreach process and manage the Safety Check directly in the web portal. Follow this guide to learn how to manage an active Safety Check.
Safety Checks Page
Clicking on Safety Checks in the left side menu will take you to a page with an overview of current and past Safety Checks.
Use the filter options at the top of the page to find a specific Safety Check. Filter by title, ID, or alert name, and adjust the date range to display only those active during a selected time period.
The table on this page provides a quick overview of:
Safety Check Status | Stating whether the Safety Check is In Progress, Completed or in Draft. |
Started | Time and date the Safety Check was initiated. |
Title | Title of the Safety Check. In case the Safety Check was automatically initiated from an alert, the title will be the same as the alert title. |
Client | Client name |
Alerts | Alert that initiated an automatic Safety Check or alert linked to a manual Safety Check. |
Type | States whether the Safety Check was auto-initiated or manually initiated. |
Reach Out | Current reach out status for that specific Safety Check. |
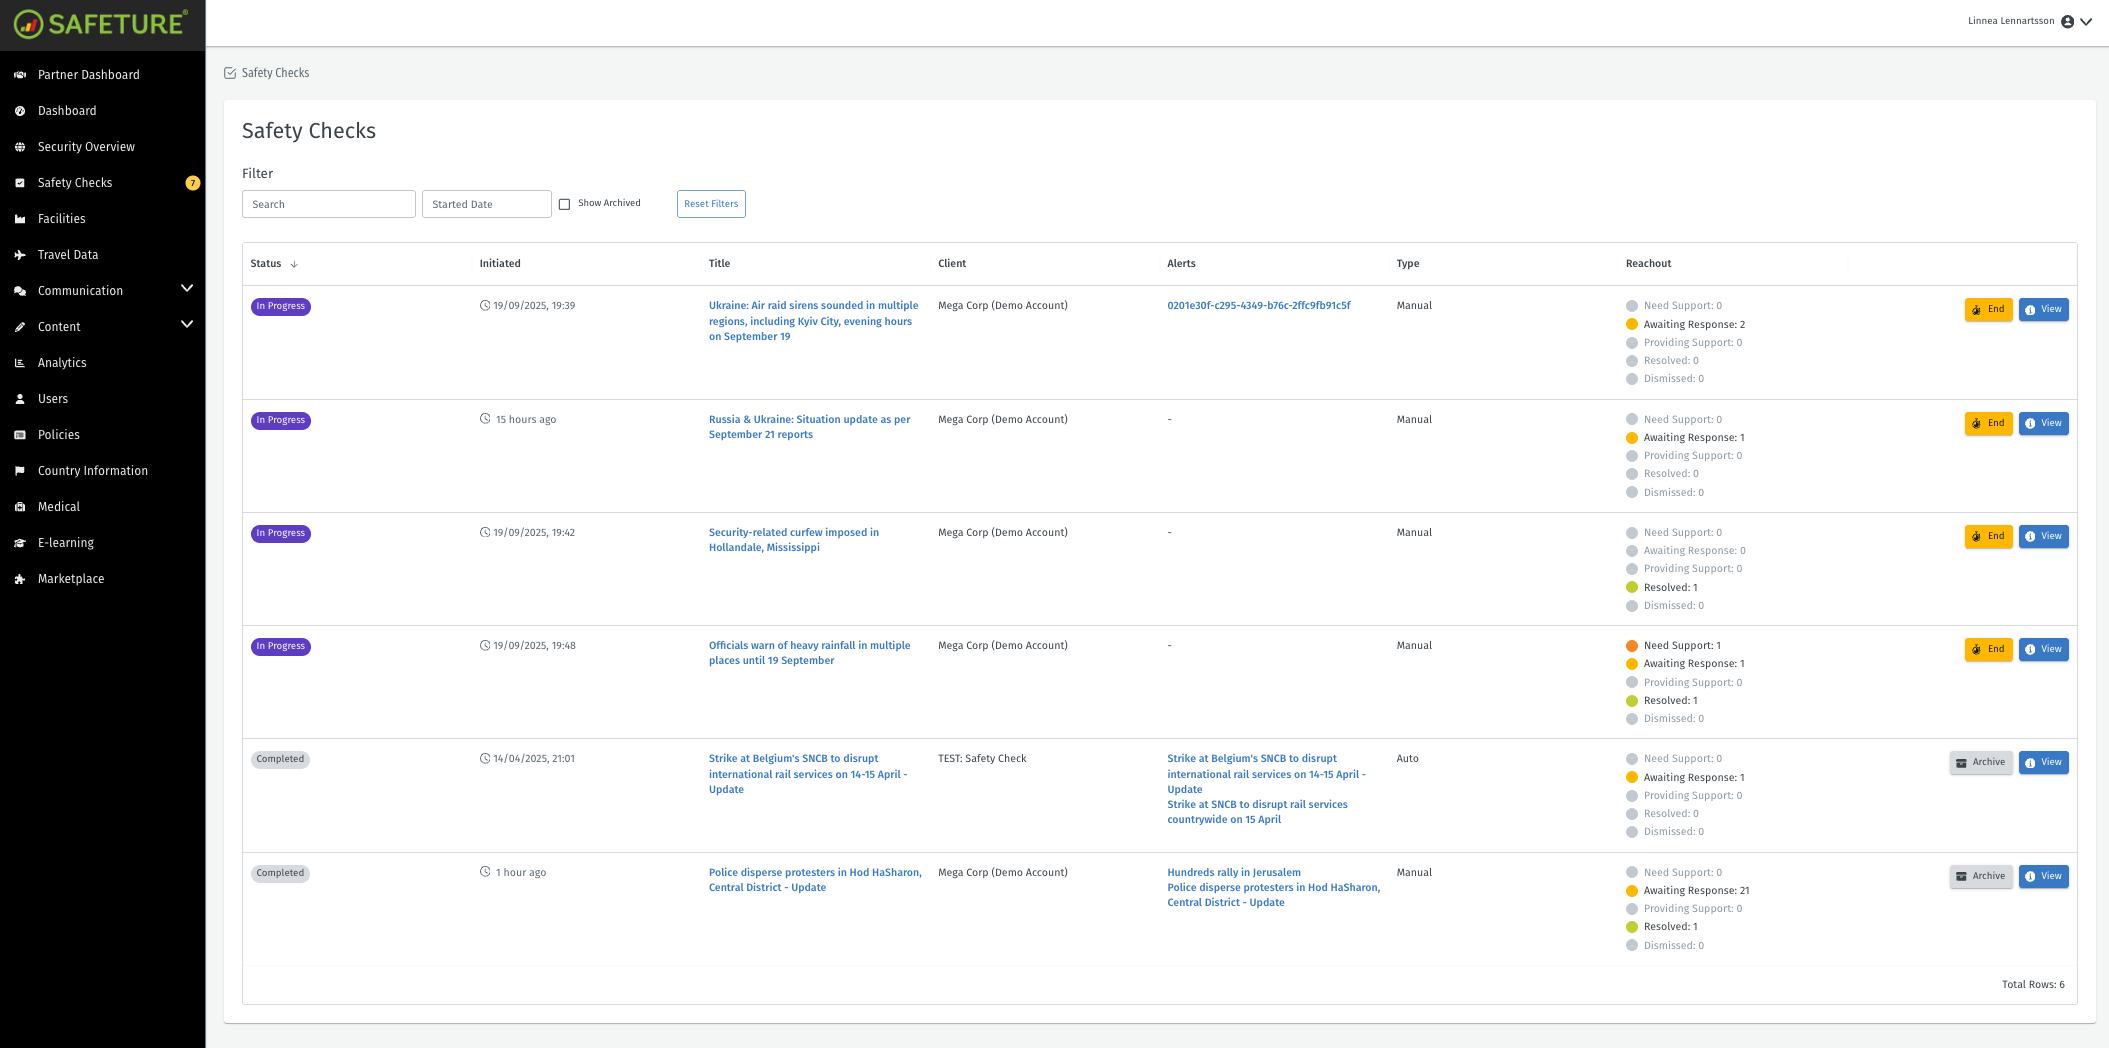
Overview of all Safety Checks
Use the buttons on the right to view, end, delete, or archive a Safety Check.
Click View next to any ongoing or completed Safety Check to open its Details page, where you can access in-depth information about that specific check.

Click View to see in-depth information for a specific Safety Check
Safety Check Details Page
The Details page displays in-depth information about a specific Safety Check.
It includes two tabs: Reach Out Overview and Chats Overview. Users with Safety Check Premium also have access to a third tab — the Safety Check Event Log.
Reach Out Tab
The Reach Out tab on the Safety Check Details page displays the Reach Out Overview, which lists all users in the Safety Check in a table with detailed information.
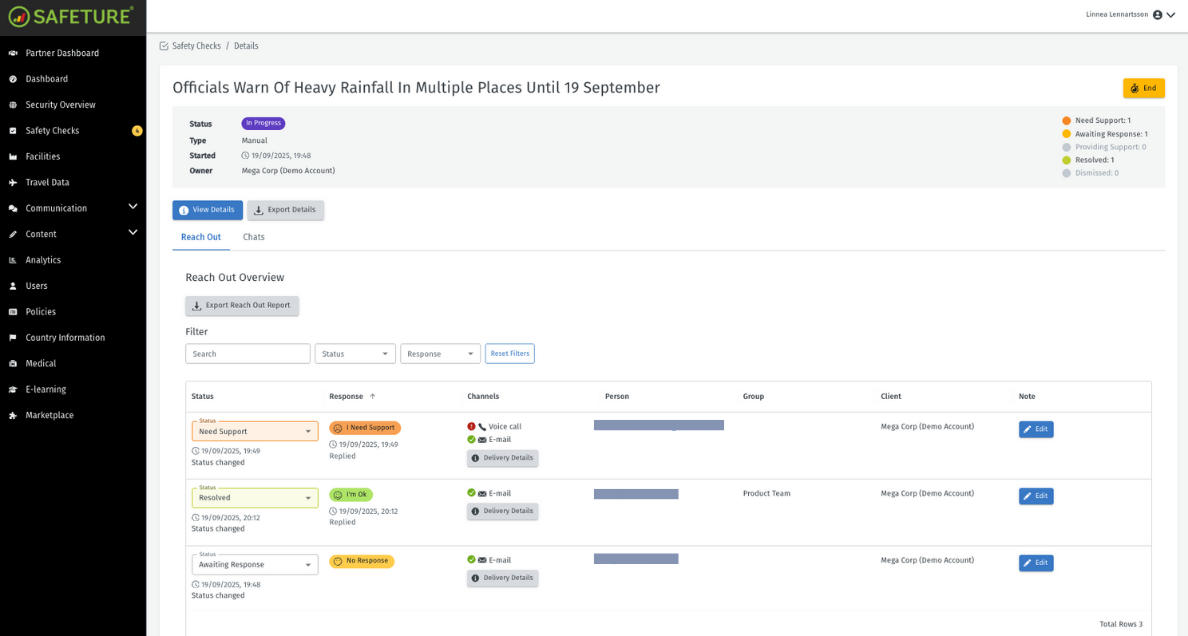
Use the search bar to find a specific person in the Safety Check, or filter results by response status. Below is an explanation of the different elements in the Reach Out table:
Status | The Status column on the left complements the user responses shown on the right. Some statuses update automatically based on each individual’s response, while others can be adjusted manually by administrators as the outreach process continues.
|
Response | The person’s response to the Safety Check.
|
Channels | Lists all available methods of contacting that specific person. If none are available, the status will show as “Not Reachable”. Depending on your organization’s settings, users may be notified through one or more of the following channels:
The green icon confirms successful sending of the Safety Check via that channel. A red icon indicates a failure to send. |
Person | The name of the affected person. |
Group | The person’s team or department (e.g., Sales, Management). |
Client | The owner of the Safety Check |
Note | The Note column shows whether any administrative notes have been added for the user. |
Chats tab
Under the Chats tab on the Safety Check details page, you’ll find all chats linked to that specific Safety Check. To add or remove a specific chat, click “Manage Chats”.
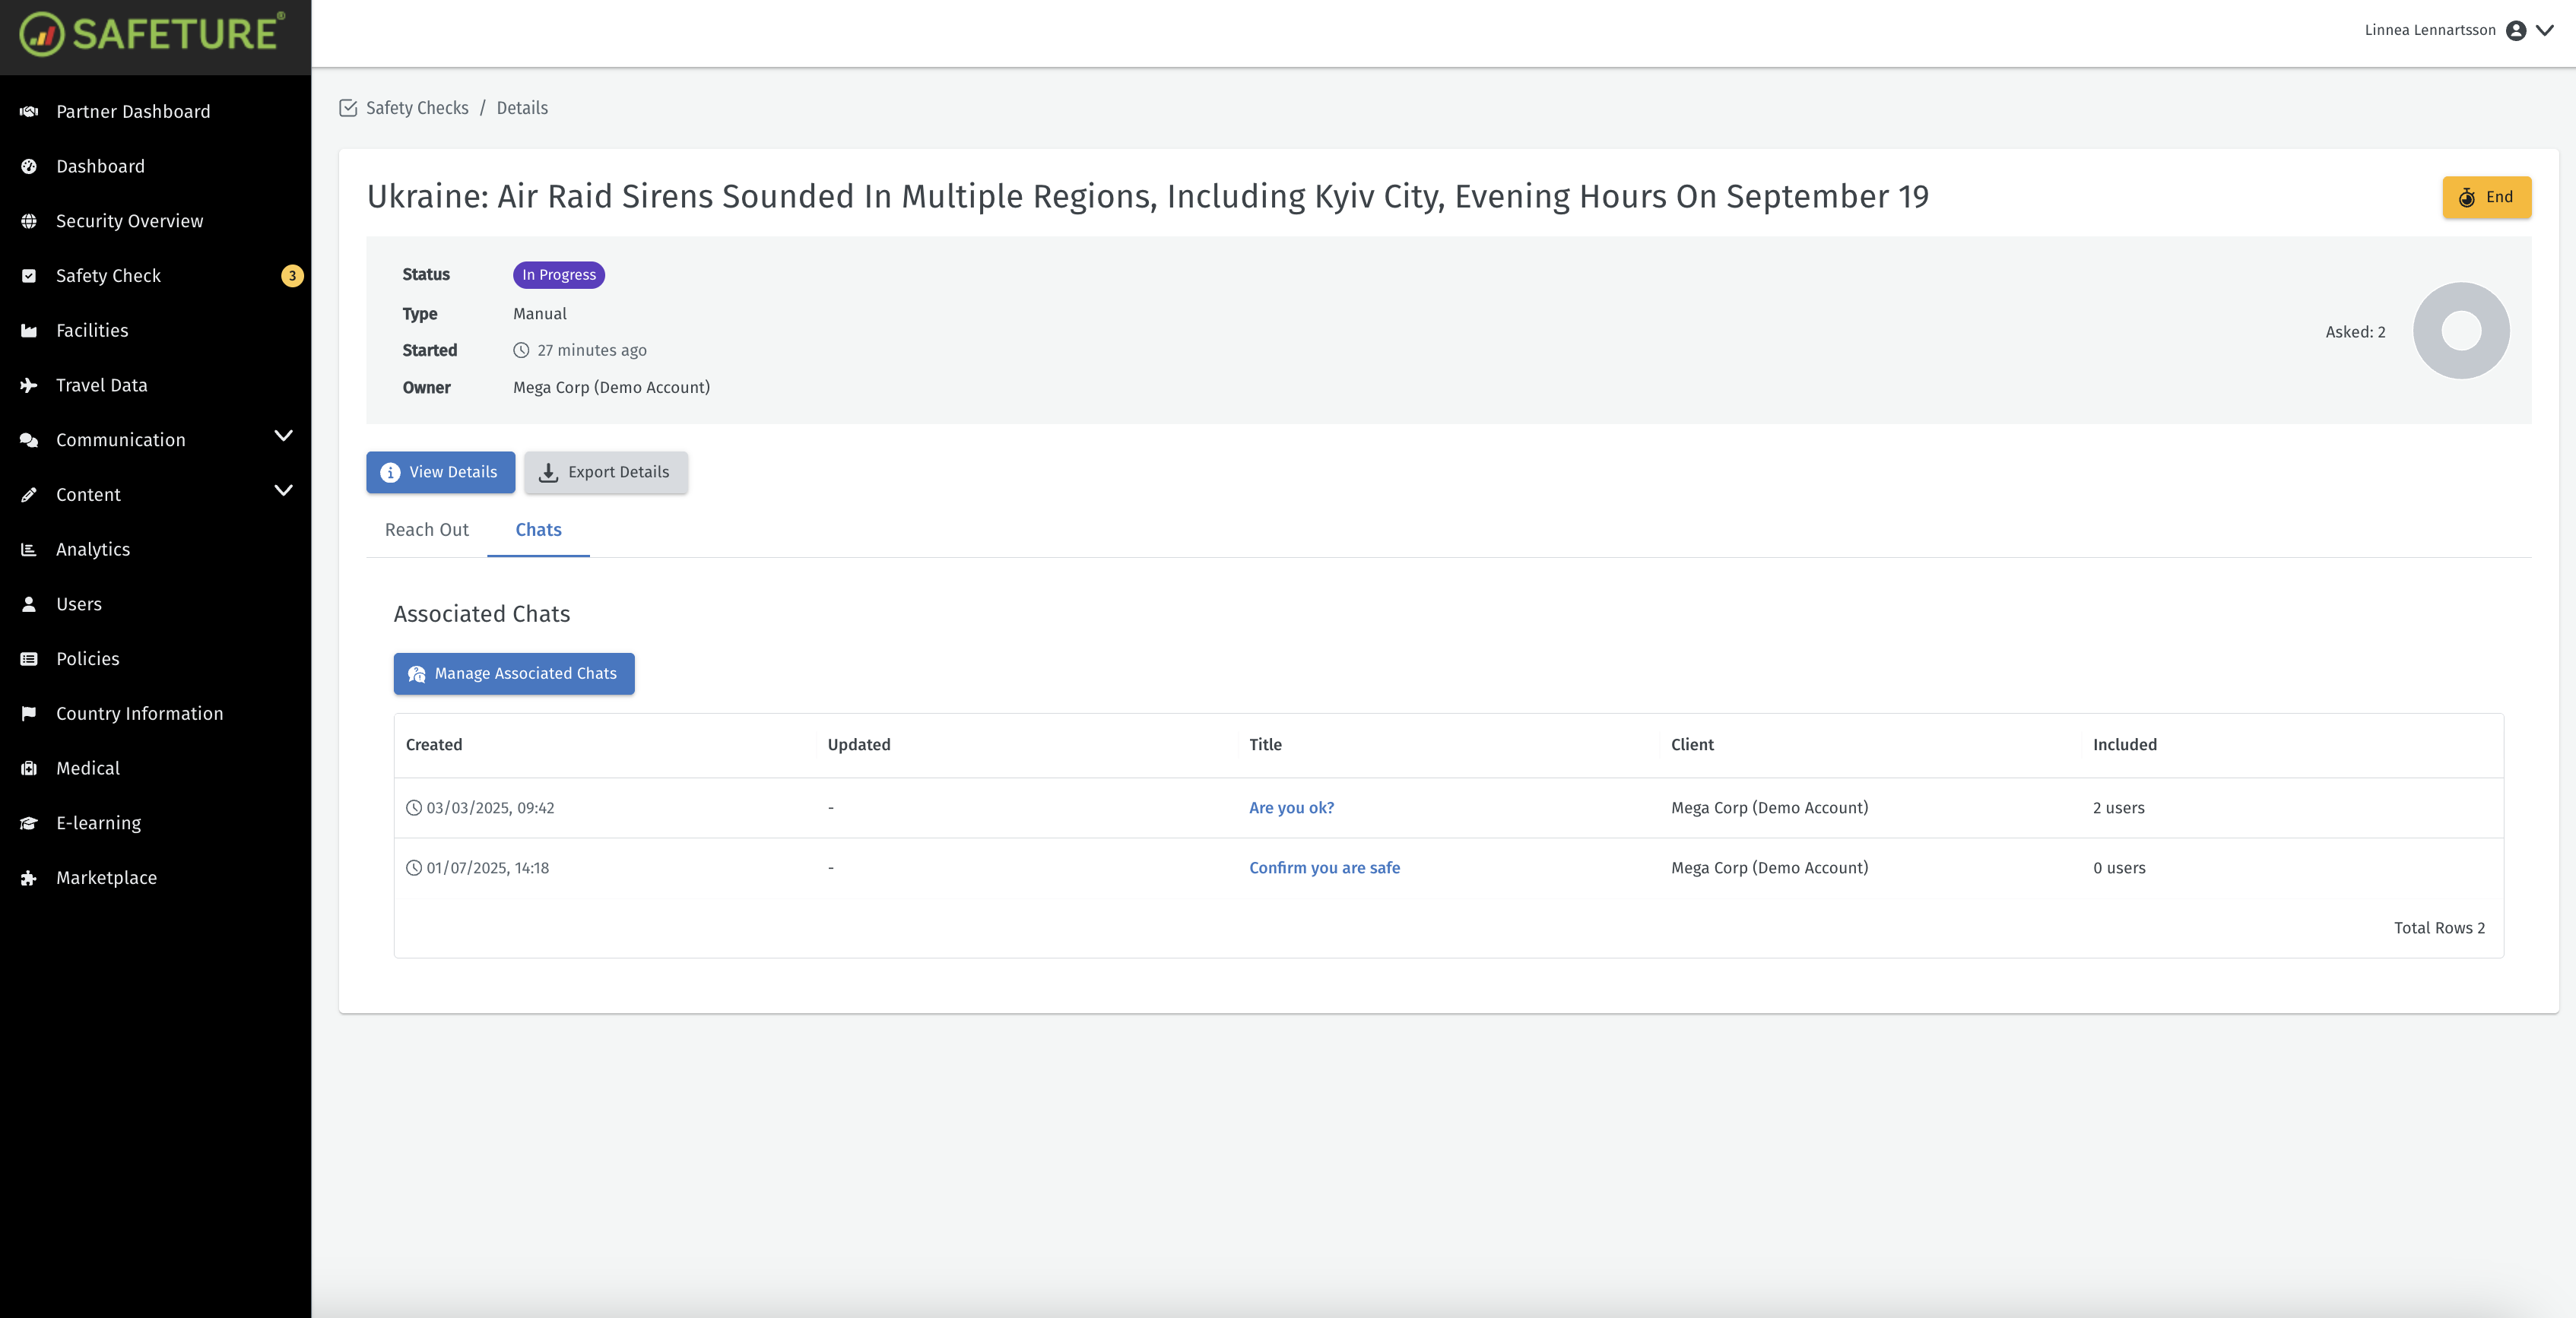
Associate chats to the Safety Check by clicking “Manage Associated Chats”.
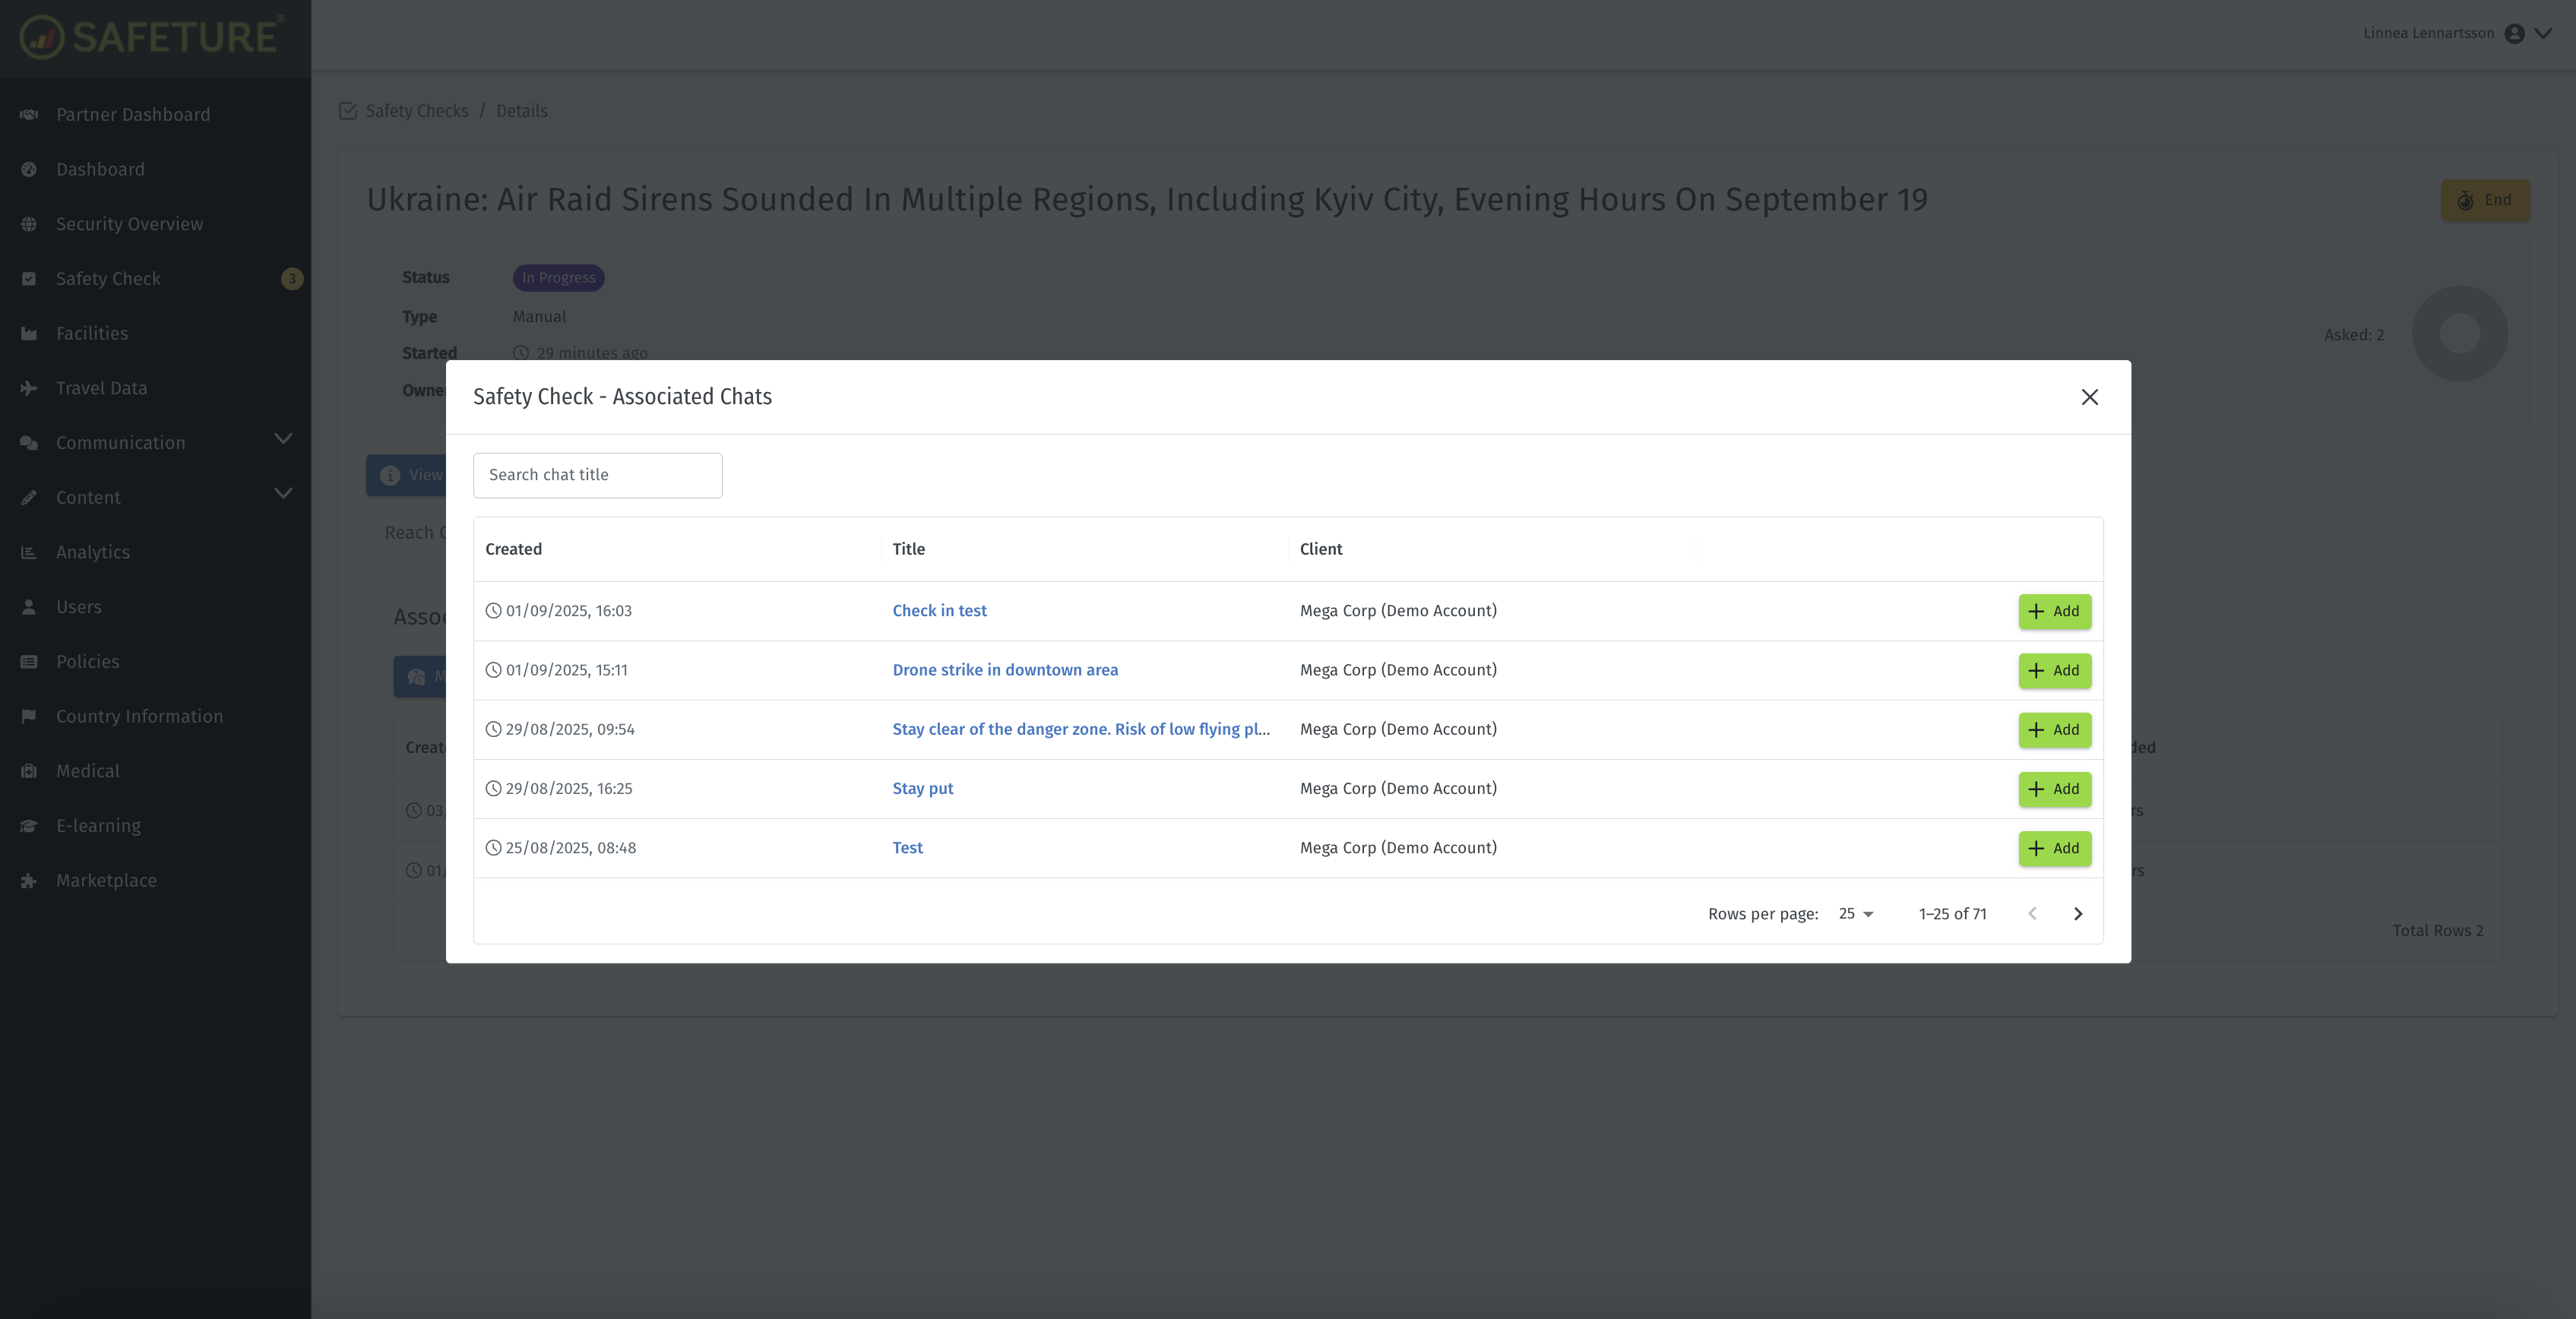
Add or Remove Associated Chats by clicking “Manage Associated Chats”.
Event Log
The Event Log provides a complete overview of everything that happens within a Safety Check in one centralized view. The log gives full visibility into every action and timestamp, making case handling smoother and handovers between administrators more efficient.
The new Event Log is included in the Safety Check Premium package.
The events that are listed in the Event Log are:
State Changed | Safety Check state changed to a new state (Draft, In Progress or Completed) |
Details Changed | The Safety Check title and/or notes changed |
Alert Added | A related alert was automatically added to the Safety Check |
Person Added | A new person was added to the Safety Check |
New Response | A new response was received (I’m OK or I need Support) |
Person Status Changed | A Person’s status changed (Need Support, Providing Support, Resolved or Dismissed) |
Chat Added | A new chat was added to the Safety Check’s associated chats |
Chat Removed | A chat was removed from the Safety Check’s associated chats |
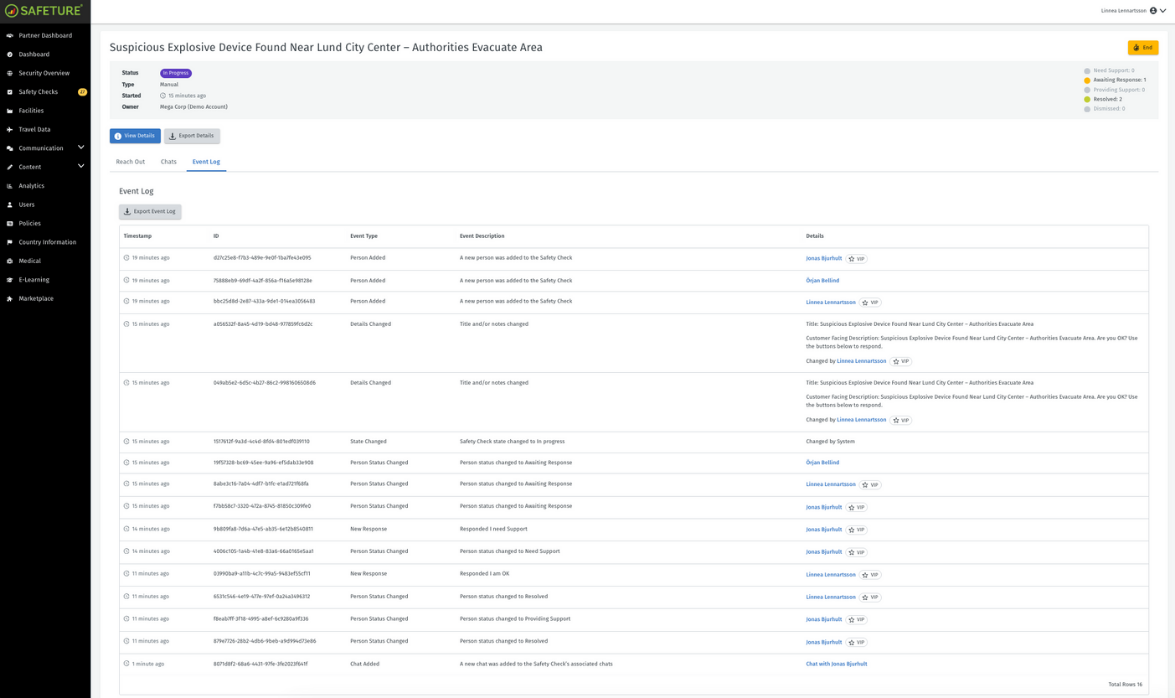
Safety Check Event Log
Ending a Safety Check
In the top-right corner, click “End” to end and complete the Safety Check. Once ended, no further responses can be submitted or recorded, and the Safety Check cannot be restarted. All statuses and records are final at this point.
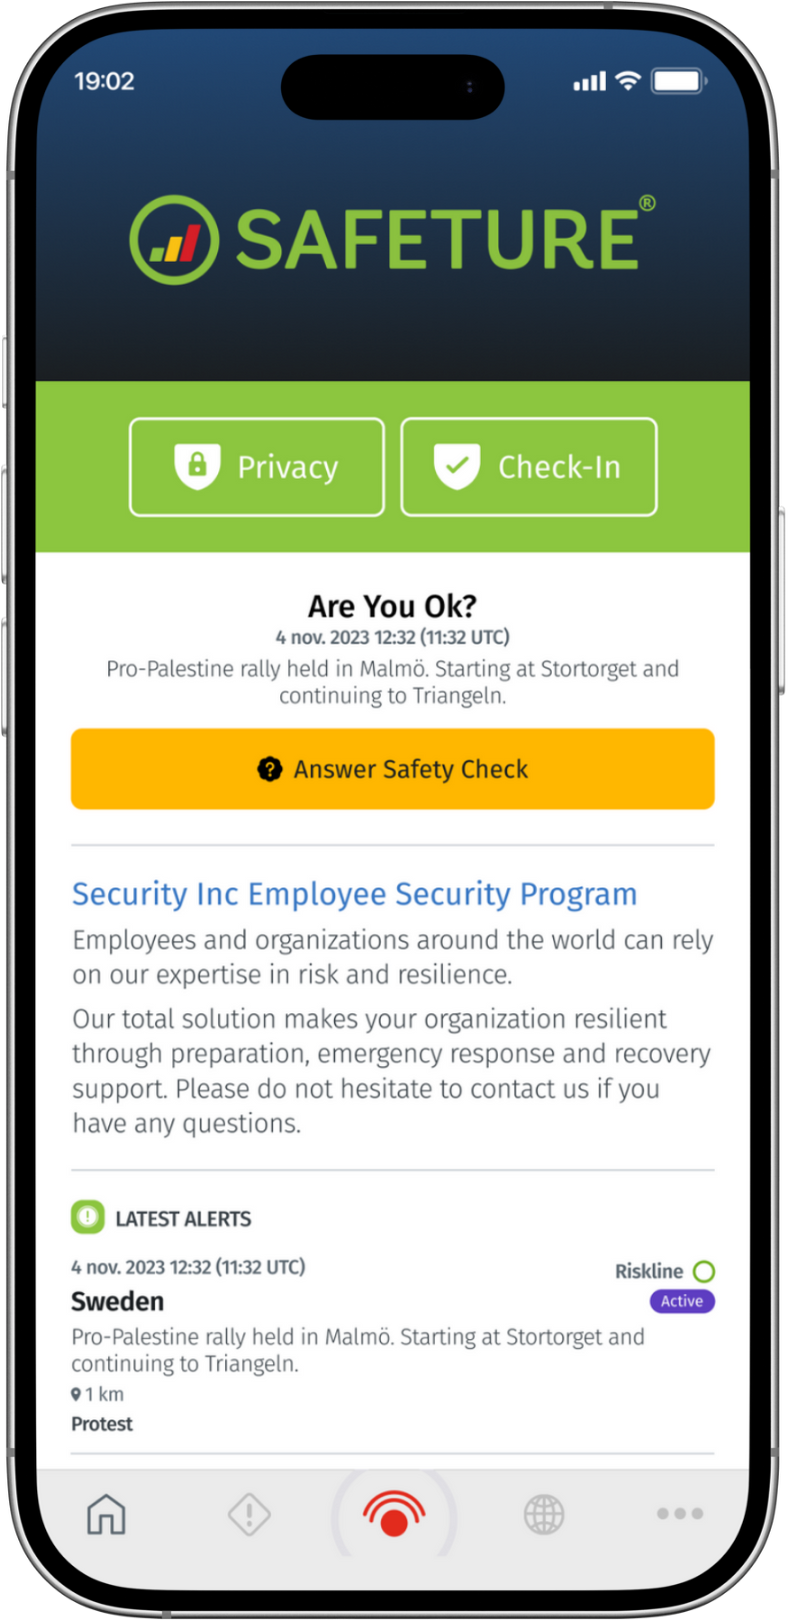
Safety Check in the mobile application
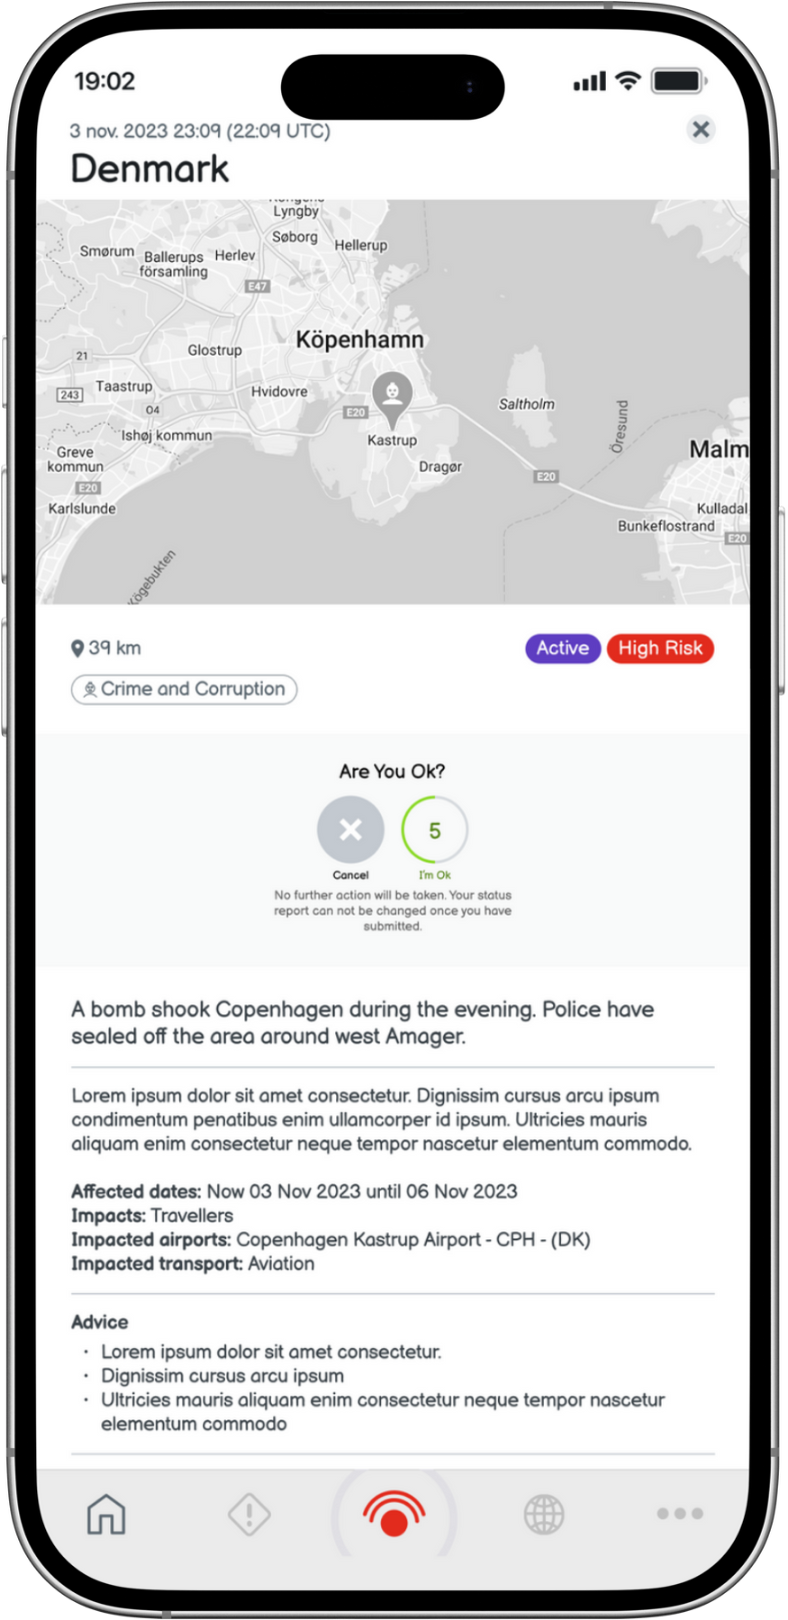
Users with the Safeture App installed will receive a push notification when a new Safety Check requires their response. Tapping the notification opens the response screen directly. In addition, a dedicated section with a yellow button appears on the app’s home screen.
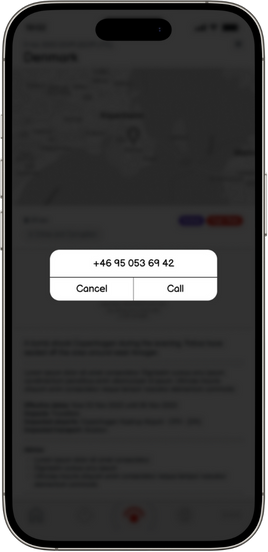
Users can respond to a Safety Check by selecting either “I am OK” or “I need support” by clicking on either icon.
Clicking an icon will start a 7-second countdown. During this time, the user can cancel their response by clicking the gray icon with an “X.” Once the timer finishes, the response is submitted and can no longer be changed.
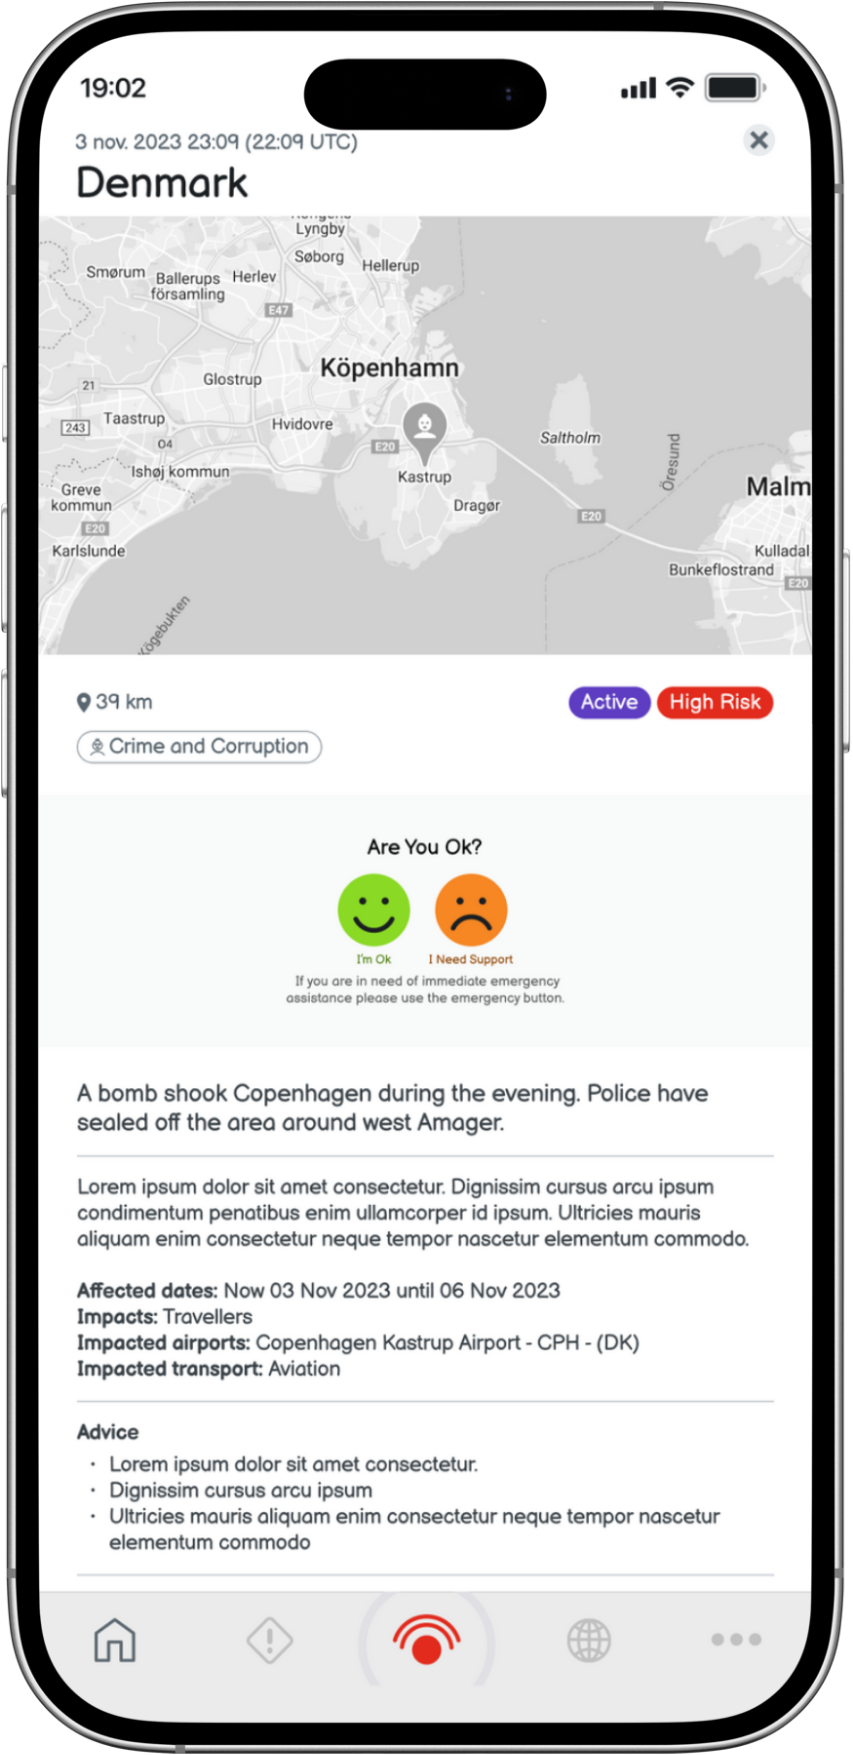
When the user selects “I need support”, a pop-up appears displaying the phone number of the user’s security provider. Even if the user does not initiate the call themselves, the “ I need suport”-response is still recorded in the Safeture Web Portal, allowing the security provider to take appropriate action.